
Updated hours for the Card/UPass/Parking Office
Tuesday, July 14 | Closed between 11:15 am - 1:15 pm
If you purchase a Residence Meal Plan through the new Begin Tower Dining Centre, you'll use your eCARD to access the Dining Centre.
Plus, you'll need your eCard for educational software discounts, to rent a locker, and to write your final exams at SAIT.
eCARD eligibility
All current students, apprentices, and staff qualify for a SAIT eCARD.
For students and apprentices, your tuition and fees must be paid in full to get your eCARD. However, you won’t need a new one if you’re a returning SAIT student or staff with an eCARD. You can use your eCARD as long as you’re registered in classes or employed at SAIT.
Students must also meet the eligibility requirements to access the Reg Erhardt Library and Athletics Centre.
Your eCARD is non-transferable and will be subject to forfeiture if presented by anyone else.
Only your legal first and last name will appear on the mobile ID, which must match your government-issued photo ID. No nicknames are allowed.
If you use a preferred name and need to change this on your SAIT account, please visit Freshdesk for more information.
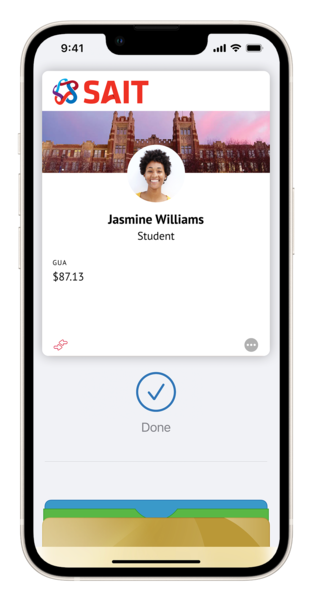
Your Mobile ID
Your SAIT eCARD can now be added to one iPhone, Apple Watch, or Android phone.
The eCARD mobile ID is available to all enrolled students, apprentices, and current employees.
Tap your iPhone, Apple Watch, or Android phone at readers across campus to conveniently access your eCARD.
Minimal setup is required to use your mobile ID, and most users can begin using their eCARD on their phones in minutes. An approved photo is required.
Tap to park with mobile ID
Effective May 1, 2025, if you have a monthly parking permit and an eCard mobile ID, you can now tap at the gate* to enter and exit your designated parking lot.
If you already have a permit, download the Transact app and set up your eCard mobile ID on your iPhone or Android device. If you prefer to continue scanning the QR code permit for gate access, no problem. QR codes and scanners will remain operational.
Still using a legacy access card? Your access card will also continue to work. If you want to upgrade to tap to park, contact Parking Services.
*Your mobile device must be NFC-enabled for the tap to work. NFC, or near-field communication, is a short-range wireless technology. If you can tap to pay, your phone is NFC-enabled. Check your settings or device compatibility to confirm. Mobile ID is available for SAIT employees and students only.
New and returning Apple users
![]() Visit the Apple App Store and download the Transact eAccounts app. Once you have downloaded the app, sign in using your SAIT login credentials, submit your photos, and add to your Apple Wallet app on your phone.
Visit the Apple App Store and download the Transact eAccounts app. Once you have downloaded the app, sign in using your SAIT login credentials, submit your photos, and add to your Apple Wallet app on your phone.
Returning Apple users
Make sure you have downloaded the Transact eAccounts app > log in using your SAIT login credentials > on the home screen, click on 'Add to Apple Wallet', and follow the prompts to re-add your mobile ID to your device.
Check the language and region on your iPhone to ensure it is set to ‘Canada’.
New and returning Android users
![]() Navigate to the Google Play store and download the Transact Mobile Transact eAccounts app. Once you have downloaded the app, sign in using your SAIT login credentials, submit your photos, and add to your Google Wallet app on your phone.
Navigate to the Google Play store and download the Transact Mobile Transact eAccounts app. Once you have downloaded the app, sign in using your SAIT login credentials, submit your photos, and add to your Google Wallet app on your phone.
Returning Android users
Make sure you have downloaded the Transact eAccounts app > log in using your SSO Login > Add to Wallet, and follow the prompts to re-add your mobile ID to the Google Wallet.
Check the country in Google Play Settings to make sure it is set to ‘Canada’.
Setup tips
In the Transact eAccounts app, you will find SAIT under our full name of Southern Alberta Institute of Technology.
To log into the Transact eAccounts app, you will use your SAIT login SSO credentials and be prompted to authenticate your device.
Make sure your device software is up-to-date. It's a necessary step to ensure security, privacy and optimal performance.
If you receive an error message when adding your ID to your Wallet, open the Transact eAccounts app and select More Information, then choose Remove ID. Confirm that the ID has been fully removed from your Wallet app. Once complete, return to the Transact eAccounts app and select Add to Wallet to add your ID back to your device.
If you changed devices and are unable to add ID to your wallet, first remove it from your old device, then add it to your new one. If you no longer have access to your old device, contact the Card Office.
You do NOT need to add money to your eCard to "activate" it for use on campus to access the Athletics Centre or Reg Erhardt Library. If you want to print on campus, you must load funds to your eCard.
Submitting your photos
If you have already successfully uploaded a photo to the Transact eAccounts app, you will not be able to resubmit a new photo. Unless the photo uploaded is very out-of-date, or you have made changes to religious head coverings, your new submission will be denied.
Selfie
To upload your photo that will appear on your mobile ID, go to Settings in the Transact eAccounts app by clicking on the gear icon in the top right corner of the home screen. Then select the Submit ID Photo tab and click on the Get Started button.
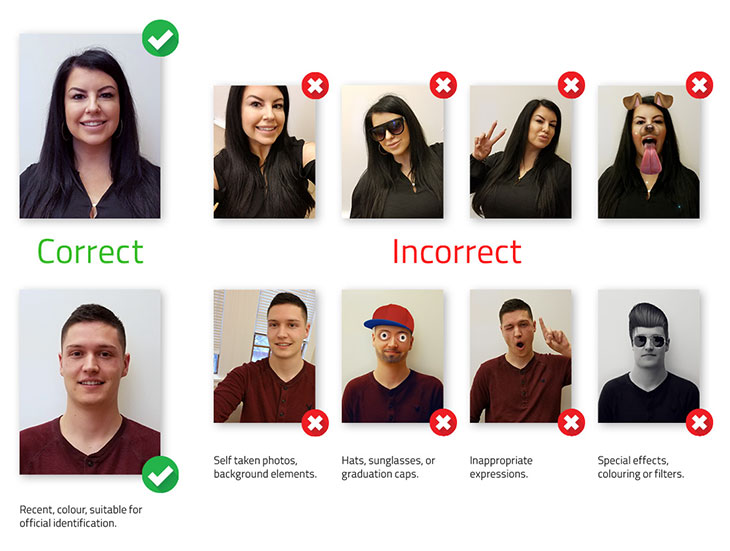
Your photo MUST:
- be in JPEG or PNG format (a smartphone photo is fine)
- have been taken in the past 6 months
- be suitable for official identification
- have space between the top of your head and the top of your photo
- have your face square to the camera, with your shoulders showing
- show you looking directly at the camera lens
- be in colour
Your photo MUST NOT:
- be a photo of another photo
- contain hats, sunglasses, or graduation caps
- have inappropriate expressions or gestures
- have anyone other than yourself visible
- be cropped too close (e.g. cutting off the top of your head)
- have background elements (e.g. shadows, trees, open rooms)
- have glare on prescription glasses
- Have any special effects, colouring or filters (modifying your photo goes against the Student Code of Conduct AC.3.4.1)
Government ID
After you have uploaded your selfie, click Next to upload your Government ID. This can be in JPEG or PNG format (a smartphone photo is fine).
We cannot accept scans, photocopies, or screenshots of your government ID.
Examples of Government ID are:
- Canadian driver's license
- Passport page with photo and full legal name
When done, click on Submit and Sign Out to complete the photo submission. We do not keep this information after the photo has been approved.
Photos will generally be approved within 1 - 2 business days.
Using your mobile ID around campus
You can load funds to your eCARD to eat, shop, and print on campus. There are no fees to start or use your SAIT eCARD.
Funds cannot be withdrawn as cash, but your balance will carry over to each semester as long as you are a registered student or current employee.
Funds can be deposited online anytime ($10 minimum and Debit, Visa, and Master Card accepted).
Adding funds through Transact eAccounts app
On the home screen of the Transact eAccounts app, click on the Add Money button. Enter the amount you would like to load ($10 minimum). Click on Credit/Debit and select PAYMENT METHOD. If you have not added a payment method you can select Add credit or debit card. Click on Submit Deposit to complete the transaction.
Apple users can also select Apple Pay if they have this set up on their phone.
Adding funds through website
To add funds to your account, click on the button below to manage your accounts online and add funds.
Family or guest deposit
Family members and guests can load money onto a student’s eCARD account at the Card Office or online.
The information entered must be identical to the SAIT eCARD. Guests need to know the full name, SAIT email address (@edu.sait.ca), and the 9-digit SAIT ID number.
Click on the button below to make a guest deposit.
Visit the Self-Serve Kiosk or Card Office
Funds can be loaded to your eCARD on campus at the Self-Serve Kiosk, located outside the west entry of the Reg Erhardt Library. Credit and Debit cards are accepted, $5 minimum. NO CASH accepted.
You can visit the Card Office during operating hours to load funds to your eCARD. Credit and Debit cards are accepted, $10 minimum. NO CASH accepted.
To pay for printing, you must load funds to your eCARD. Your printing cost is immediately deducted from the balance on your eCARD when you select Print in your software.
You can use funds loaded to your SAIT eCARD to pay for parking.
Daily parkers can choose to pay for parking at the Parking Office using their SAIT eCARD (current students only)
Parkedin™ now accepts your SAIT eCARD as a payment option within the app, allowing you to pay for parking on your mobile device easily.
❗️Please note this feature is only available within the Parkedin™ app and not on the web version.
To add your eCARD as a payment option in Parkedin™ app:
- Select Pay with eCard under payment options
- The SAIT eCard authentication screen will appear
- Enter your user credentials
- You will now be able to use your eCard to pay for parking!
You can also pay for your parking permits and tickets through the SAIT Parking Services Self-Service Portal for Parking (AIMS)
To add your eCARD as a payment option in the Self-Service Portal:
- Login to the self-service portal for parking (SAIT Student Login or SAIT Staff Login)
- Add the fee to the cart
- Select Pay by SAIT eCard
- Checkout using the payment type
Aldred Centre, main floor
- Second Cup
- Bento Sushi
- Toum
Art Smith Aero Centre, main floor
- Aero Centre Cafe
Begin Tower, main floor
- Begin Tower Dining Centre
Cenovus Energy Centre, main floor
- Tim Hortons
John Ware Building
- Culinary Campus International Market
- 4Nines Diner
- The Highwood Kitchen + Bar
- The Butchery by SAIT
Johnson-Cobbe Energy Centre, main floor
- Starbucks
- Subway
Senator Burns Building, main floor
- Tim Hortons
Stan Grad Centre, main floor
- Bookstore
- Jugo Juice
- Food Court
The Tastemarket Canadian Kitchen (downtown campus)
- Tastemarket
- SAITSA food and market locations
- Door access
- Laundry in Residence
- Vending machines.
On Apple devices, open the Wallet app > tap your Student ID to view it and find account balances > tap the More button (… OR ⓘ) in the top right to display status (Student or Employee), SAIT ID number and account balance(s).
On Android devices open the Google Wallet app > scroll to find your Student ID > tap your Student ID > tap the More button ( ⁝ ) in the top right to display status (Student or Employee), SAIT ID number and account balance(s).
eCard frequently asked questions
Accessing, managing, and securing your account
Name information on the mobile ID comes from SAIT’s core business systems and updates need to be made through them.
- Students should contact The Office of the Registrar
- Faculty and staff should contact Employee Services
Once changes are completed the updates will sync to the mobile ID on your phone within 48 hours.
Return to the location of the sale and request the store issue a credit/debit card refund, then process the transaction again using your mobile ID.
If you have a physical eCARD (ID) it will become ‘inactive’. If you have a mobile ID will become ‘inactive’, and will be ‘retired’ when you no longer meet eligibility requirements.
If you transfer to another participating program or school at SAIT, your credential will stay active and update accordingly. Or if you return to SAIT, you can re-add your mobile ID to your device by following the instructions found under New and Returning Apple Users or New and Returning Android Users.
During regular business hours, contact the Card Office at 403.774.5296 to notify us to deactivate the eCARD mobile ID.
Be sure to specify whether a physical card, watch, and/or phone version should be deactivated. Any device not specified to be suspended will remain active.
If applicable, identify the fraudulent activity.
To deactivate the card yourself in the Transact eAccounts app:
- Select the settings gear icon in the top right corner
- Select the Card Management tab
- Choose the credential you want to deactivate, and toggle to off
To deactivate the card in the Transact eAccounts web version:
- Select Card Services in the top banner
- Select Deactivate Card
- Select the credential to deactivate, and click on Deactivate Card
You will receive a confirmation email. Only the selected card will be deactivated. All other credentials will remain active.
To reactivate a found credential that was marked ‘lost’, perform the following steps:
In the Transact eAccounts app:
- Click the setting gear icon in the top right corner
- Select the Card Management tab
- Choose the credential you want to reactivate, and toggle to On
In the Transact eAccounts web version:
- Select Card Services in the top banner
- Select Activate Card
- Select the credential to reactivate
You will receive a confirmation email. Only the selected card will be reactivated.
SAIT mobile ID
Contact the Card Office in person during operating hours at the SAIT Main Campus. We are located on the main floor of the Senator Burns building, room NN104 (our service windows are in the hallway, right of the Tim Hortons).
Instructions can be found on the Email and Logins page. You can contact the ITS Service Desk in person during operating hours at the SAIT Main Campus. They are located in the basement of the Stan Grad Centre, room MB027. You can call 403.774.5200 or email its.support@sait.ca, as well.
If you still have a physical ID from a previous year, you can continue to use that card. The date on the card is the print date, not an expiry date.
However, we recommend using the mobile ID for security and convenience.
❗️You cannot have both the mobile ID and the physical eCard.
For increased security and to reduce our reliance on plastics to align with SAIT’s commitment to environmental sustainability, we are encouraging the use of the mobile ID.
If your phone does not support the mobile ID, or your SAIT program requires a physical ID, please contact the Card Office at card.office@sait.ca or call 403.774.5296.
You can check your balance at the Self-Serve Kiosk, vendors across campus, and on your SAIT Transact eAccount online or through the app.
To dispute a transaction on your eCARD, please contact the Card Office within 14 days of the suspicious activity.
eCARDs can be issued for guests as a non-photo eCommerce cards that can be used at participating outlets on campus.
Guest eCARDs are available from the Card Office during operating hours. You can email card.office@sait.ca or call 403.774.5296 for more information.
eCARD policies and procedures
By enabling your mobile credential and adding it to Apple Wallet or Google Pay, you have agreed to accept all current and future Southern Alberta Institute of Technology (SAIT) campus policies relative to SAIT’s eCARD mobile ID. Adding our eCARD mobile ID to Apple Wallet or Google Pay allows the use of your mobile device, including Apple Watch, in place of your eCARD at all of SAIT’s current ID readers for payments, meal plans, library, and more. Any misuse, including sharing your mobile credential with any other individual or using on a device that does not belong to you, is in strict violation of the SAIT policy and may result in disciplinary action.
Your SAIT mobile credential serves as your identification (ID) and must be carried with you at all times while on SAIT campus. SAIT representatives may ask to see your mobile credential as a means of official identification. Your mobile credential will automatically deactivate upon program completion, termination, or withdrawal.
Your personal information (First name, Last name, and ID number) will be collected by the third-party application (Transact) and some information will be stored on-premises at SAIT to validate your identity and prevent fraud.
SAIT (public body) is governed by Alberta’s Access to Information Act (ATIA) and Protection of Privacy Act (POPA), and other relevant legislation and regulations. Learn more about SAIT’s Privacy policy and procedures, which are regularly updated to reflect any changes. We also encourage you to review the Transact Privacy Policy before using this third-party application.
The personal information collected through the Transact eAccount app is used to create your SAIT identification (ID) and will be input into an automated system to generate content or make decisions, recommendations, or predictions.
This collection is authorized by section 4(c) of the Protection of Privacy Act. For questions about the collection of personal information, contact the Privacy Officer at access.privacy@sait.ca or by phone 403.389.2707.
For any other questions or if you lose your mobile device, please contact the Card Office by visiting NN104 (main floor), Senator Burns Building, SAIT Main Campus, calling 403.774.5296 or email card.office@sait.ca.
Between terms, your account balance will automatically carry over and you may continue to use your SAIT eCARD.
Refunds will only be made if your relationship with SAIT ends, such as when you graduate. Upon your email request to the Card Office, account balances over $100 will be refunded by cheque.
Refunds will only be issued on user account deposits. The Card Office will then deactivate your account. Reactivation will be allowed only after a replacement card fee is paid.
If your account has no activity for two years, it will be deactivated. Funds will be credited back to your SAIT eCARD account in full if the deactivated account is reinstated later.
You can deactivate your physical or mobile ID card if it’s lost or stolen through your SAIT Transact eAccount online or via the mobile app 24/7.
This will deactivate your SAIT eCARD immediately.
You can also report your eCARD lost or stolen by emailing card.office@sait.ca, with the subject line “Lost my SAIT eCARD.” Your SAIT eCARD will be marked ‘lost’ the following business day.
To replace your mobile ID, simply follow the instructions found under New and Returning Apple Users or New and Returning Android Users.
You can then reactivate the mobile ID by following the instructions under Accessing, managing, and securing your account > How do I reactivate my credential if I find my lost device?
To replace your physical SAIT eCARD, please visit the Card Office with a piece of government-issued photo ID, such as a Canadian driver’s license or passport.
Lost, stolen, or damaged SAIT eCARDs can be replaced for a fee of $25. The only exception is when a card needs to upgraded or is older than four years.
Your old card will be permanently deactivated once you have purchased a replacement card. If your SAIT eCARD is found before you replace it, you cannot reactivate by phone or email – you must visit the Card Office in person.
Due to security issues or possible fraudulent use, you cannot keep your old card if you have already replaced it.
SAIT eCARDs that have malfunctioned will be evaluated and replaced free of charge.
All students, apprentices, and staff are eligible to receive a SAIT eCARD with their picture identification.
Your SAIT eCARD serves as your identification (ID) and must always be carried with you while on SAIT campus. SAIT representatives may ask to see your SAIT eCARD as a means of official identification.
Access to SAIT services will be subject to the policies of each department. Failure to comply with these policies may result in loss of privileges.
To dispute a transaction, contact the Card Office within 14 days of the suspicious activity.
See the SAIT eCard Cardholder Agreement.
Contact us
eCard Office
Monday - Friday | 8:30 am - 4 pm (Closed weekends and holidays)
NN104 (main floor), Senator Burns Building, SAIT Main Campus
- Phone
- 403.774.5296
- card.office@sait.ca

Oki, Âba wathtech, Danit'ada, Tawnshi, Hello.
SAIT is located on the traditional territories of the Niitsitapi (Blackfoot) and the people of Treaty 7 which includes the Siksika, the Piikani, the Kainai, the Tsuut’ina and the Îyârhe Nakoda of Bearspaw, Chiniki and Goodstoney.
We are situated in an area the Blackfoot tribes traditionally called Moh’kinsstis, where the Bow River meets the Elbow River. We now call it the city of Calgary, which is also home to the Métis Nation of Alberta.